
This is an Impetus Light Cavalry base made by saboting four 40x60mm DBx LH bases together. Awesome figures aside, it looks kind of regimented, a little stodgy, and is super expensive with 8 figures crowded together.
This is the same LC base using a movement tray. The figures have room to skirmish, and there’s also room to admire the loving attention I lavished on each one. Furthermore, one pack of Perrys equals one base in this standard. Same base: nearly ⅓ the price.
So how did I get from before to after?
Fortunately, back in the last century when I first bought my 25mm Turks, I had the foresight to base them individually, anticipating just such a possibility. Since all my figures are based on the same 20x40mm magnetic bases, it’s easy to create nice looking diorama display bases for them. In this post I’ll show you how.
Materials

I had an idea that I wanted very tidy base holes on my sabot, but couldn’t figure out what to use as a walling material to keep the base texture from spilling over into the holes. I finally hit upon the idea of using spare plastic sprue: I have a ton kicking around, since I never throw anything out, and fortuitously they are the exact same height (3mm) as the saboted bases. I also got my friend Jahan to cut me some 6x12cm steel rectangles for the sabots themselves (thanks Jahan!)
You’ll also need:
-Wood Filler or other base texture
-Carpenter’s Glue
-Tool for spreading filler
-Sprue Cutters
1. Cut ~43mm and ~23mm lengths of sprue to make enough base holes. Precision is not necessary. I want some overlap so that the outside of the hole is also a rectangle. I did a batch while watching a movie with my wife, much to her annoyance.
2. Arrange the figures on the base. Fit the sprue around the figures, moving the figures to ensure that there is enough room for the sprue! If you want more figures on a base you may have to make a double or triple box to ensure there’s enough space for everybody. A close fit isn’t necessary here, and in fact a looser fit is preferable to give yourself a little wiggle room when emplacing and removing the figures.
So how did I get from before to after?
Fortunately, back in the last century when I first bought my 25mm Turks, I had the foresight to base them individually, anticipating just such a possibility. Since all my figures are based on the same 20x40mm magnetic bases, it’s easy to create nice looking diorama display bases for them. In this post I’ll show you how.
Materials

I had an idea that I wanted very tidy base holes on my sabot, but couldn’t figure out what to use as a walling material to keep the base texture from spilling over into the holes. I finally hit upon the idea of using spare plastic sprue: I have a ton kicking around, since I never throw anything out, and fortuitously they are the exact same height (3mm) as the saboted bases. I also got my friend Jahan to cut me some 6x12cm steel rectangles for the sabots themselves (thanks Jahan!)
You’ll also need:
-Wood Filler or other base texture
-Carpenter’s Glue
-Tool for spreading filler
-Sprue Cutters
1. Cut ~43mm and ~23mm lengths of sprue to make enough base holes. Precision is not necessary. I want some overlap so that the outside of the hole is also a rectangle. I did a batch while watching a movie with my wife, much to her annoyance.
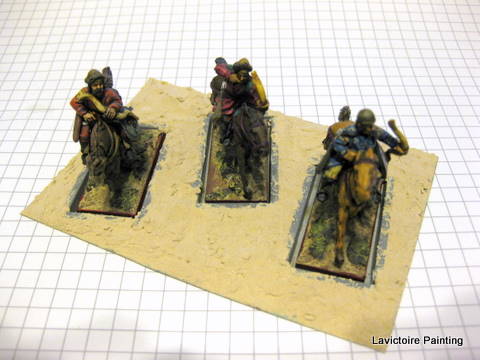
2. Arrange the figures on the base. Fit the sprue around the figures, moving the figures to ensure that there is enough room for the sprue! If you want more figures on a base you may have to make a double or triple box to ensure there’s enough space for everybody. A close fit isn’t necessary here, and in fact a looser fit is preferable to give yourself a little wiggle room when emplacing and removing the figures.

Glue the sprue onto the sabot using Carpenter’s glue. Taking care not to shift the sprues, remove the figures to make sure you don’t unintentionally glue the figure to the base as well. Leave to dry.

3. Fill the spaces around the sprue rectangles with the texturing material of your choice. I chose to be pretty sloppy on the first pass, and will do detail filling once they are dry.


The finished base, ready for painting and flocking. Too easy! :)


Diggity!
ReplyDeleteThis was just brilliant. Love it!
ReplyDelete