Showing posts with label 25mm. Show all posts

Monday, September 9, 2013

Stuff to Hide Behind: A Frankenstein Box

A few months ago I made a nice order with Warmill, a British terrain company specializing in 25mm sci-fi MDF kits. Warmill's stuff is unusually characterful, in a field of generally serviceable MDF terrain providers. Their kits tend to come complete with wry humor and detail that's pretty welcome, in sharp contrast to the grim dark future most folks seem to want to portray.


I needed some more mid-sized terrain for my Infinity table project, Bachs Freiberg, so I grabbed a fast food restaurant ('Southern Fried Watersnake') and a couple of bio-vending machines ('ORBs'). The latter are largish vending machines that a user can employ to give themselves various cybernetic upgrades, at low cost but apparently some risk.

The kits arrived across the pond quickly enough, and nicely packaged in slim, sturdy boxes, with a pretty picture on the front! Cracking one open, I found three frames and a baggie with lots of clear plastic bits for signage:


Also included were fully-illustrated assembly instructions, Ikea-style. I couldn't wait to get these puppies together!

4"x5" Clever Booth assembled, with Hellcat for reference

The kits friction-fit nicely together, perhaps just a little too loose not to require gluing, but at least I didn't have the tab-snapping frustration that I did with some of the Micro Arts Studios kits I've put together. The material is lightweight but looks sturdy and did not fray or split when I punched them out of their frames. Everything came together very nicely; I would rate the kits as somewhat complicated but the instructions are clear and it's pretty hard to put bits in the wrong way, although you have to pay attention to which side the detail is etched onto (as I found out to my chagrin at one point). 

Unfortunately in order to paint the damn thing, I had to take it nearly completely apart again. The front tray is designed to slide back and forth, and must be painted separately. This is not a design flaw, but a personal picadillo - I just don't enjoy painting subassemblies. Despite my neurosis, however, painting and reassembly wasn't a problem, and I'm satisfied with the final result. 


I have been experimenting with dry pigments and since I don't have an airbrush, I figured this would be the medium to test things on. I like the pastel finish a lot and think that this technique will provide a nice backdrop to the more saturated tones of the figures themselves. As you can see there is a detachable waste bin on the back (in case something goes terribly wrong with the bio-upgrades!) which makes for some useful additional scatter terrain. The sliding tray in the front is also fully articulated although I had to wiggle it around for a couple of days as the paint dried ;) 

So that's Warmill's ORB 2.0 Clever Booth. I'm currently engaged in the finishing up the rest of my haul, but I'm looking forward to adding their new releases to my collection - I still have room on my table for a Surgery Shack! 

Thursday, August 1, 2013

Napoleonics Redux: 25mm Napoleonics, Speed Painted

So I'm back at the Toronto Historical Miniatures Gamers club lately, and one of the guys wanted to play Songs of Drums and Shakos this week. "Sure," I said, though I'd never played and have no painted figures. Then I went rooting around my drawers to see what I could find.

I turned up a few suitably skirmish-y Foundry figs that I picked up from who knows where, and a couple of dismounted Perry dragoons that came in the Historicon 2010 loot bag. "Can I use these here dragoons as Light Voltigeurs with Carbines instead of muskets for 39 points each?" I asked (I had 78 points to spend). "Go for it." So I went for it. and decided that this would be as good a time as any to try the Army Painter Quickshade technique. Here's what 6 hours' work gets you:


I am super happy with the results, considering the time put in. As my buddy Anthony said, they did indeed look like a complete mess until 2 minutes before finishing. But the matte spray worked its miracle.

The technique:

1. clean the models and spray with your base color. I used Army Painter Crystal Blue, which looked -terrifyingly bright at first. Don't worry, the Quickshade fixes that.
2. Block paint the figures in the most mundane way possible. Complete coverage is the goal, even over precision. Bright, saturated paints are preferable. I used different whites for the uniform and the webbing, but I'm not sure anyone can tell the difference.
3. Brush on the quickshade, dealing with any obvious pooling right away. I think it's possible to be too sparing with the shade, but you don't want to drown the figure either. (I used the Strong tone).
4. Let it dry 18-24 hours, then spray with matte sealer. Army Painter makes one, but I think Testors Dullcote will work too. I sprayed each figure individually with a glove protecting my off hand because I wanted to make sure got full coverage.
5. Apply final highlights and details as necessary.

-I added a few details (like the red piping) afterwards, but I think for the next batch I will completely finish the models before shading them. I expect they will still need subsequent highlighting anyway, but a finished figure will look better imo.
-I'm considering priming the French white instead of blue, since a) there's more white than blue on the uniform and b) it's easier to paint blue over white than vice versa.

So like I said, I'm thrilled with this technique, and have already started on the Victrix line infantry that have been sitting in my drawer for 3 years. At this rate, I may in fact have a 25mm Napoleonics army before I'm dead! :D

Friday, January 27, 2012

Haqqislam WIP


Normally I don't like to post 'Work In Progress' shots but I offered to assemble a friend's Haqqislam force to help kickstart him into the game, and he agreed. Here they are!

I threw them over bases textured with some gridded plasticard I had kicking around.

As usual, they're pretty nice figures. I love the Muyibs; their helmets remind me of Zhodani from the old GDW Traveller role-playing game. And the Feuerbach dude's armor is really nicely detailed, with lots of overlapping plates and ventilation details. But I like them all, and hope to one day add a few to my own collection.

Monday, January 23, 2012

How To: Impetus Sabot Bases for 25mm Gaming


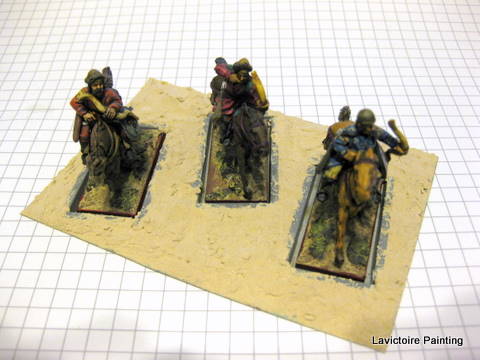
This is an Impetus Light Cavalry base made by saboting four 40x60mm DBx LH bases together. Awesome figures aside, it looks kind of regimented, a little stodgy, and is super expensive with 8 figures crowded together. 


This is the same LC base using a movement tray. The figures have room to skirmish, and there’s also room to admire the loving attention I lavished on each one. Furthermore, one pack of Perrys equals one base in this standard. Same base: nearly ⅓ the price.

So how did I get from before to after?

Fortunately, back in the last century when I first bought my 25mm Turks, I had the foresight to base them individually, anticipating just such a possibility. Since all my figures are based on the same 20x40mm magnetic bases, it’s easy to create nice looking diorama display bases for them. In this post I’ll show you how.

Materials


I had an idea that I wanted very tidy base holes on my sabot, but couldn’t figure out what to use as a walling material to keep the base texture from spilling over into the holes. I finally hit upon the idea of using spare plastic sprue: I have a ton kicking around, since I never throw anything out, and fortuitously they are the exact same height (3mm) as the saboted bases. I also got my friend Jahan to cut me some 6x12cm steel rectangles for the sabots themselves (thanks Jahan!)

You’ll also need:

-Wood Filler or other base texture
-Carpenter’s Glue
-Tool for spreading filler
-Sprue Cutters

1. Cut ~43mm and ~23mm lengths of sprue to make enough base holes. Precision is not necessary. I want some overlap so that the outside of the hole is also a rectangle. I did a batch while watching a movie with my wife, much to her annoyance.

2. Arrange the figures on the base.
Fit the sprue around the figures, moving the figures to ensure that there is enough room for the sprue! If you want more figures on a base you may have to make a double or triple box to ensure there’s enough space for everybody. A close fit isn’t necessary here, and in fact a looser fit is preferable to give yourself a little wiggle room when emplacing and removing the figures. 


Glue the sprue onto the sabot using Carpenter’s glue. Taking care not to shift the sprues, remove the figures to make sure you don’t unintentionally glue the figure to the base as well.  Leave to dry.


3. Fill the spaces around the sprue rectangles with the texturing material of your choice. I chose to be pretty sloppy on the first pass, and will do detail filling once they are dry.


The finished base, ready for painting and flocking. Too easy! :)

Monday, October 31, 2011

First Time In a Long Time: Greebo Wood Elves

When I first saw Greebo's Sylvania Elves on Talk Fantasy Football, I knew I had to have 'em. Not only am I not above a little cheesecake in my Blood Bowl collection (cf Murder City Black Wings), but they immediately struck me as one of the most beautifully-conceived fantasy football teams sculpted to date.

Then I saw Micro Art Studios' Forest bases and knew I had not only my next BB team, but a plan. The only trouble was, I'm in Bosnia, with an expensive and unreliable postal service.

Fortunately my buddy Watts came to the rescue, picked up the bases I ordered locally but never arrived, and delivered them to my pal Amila, who dropped 'em off on a visit here. Compared to that the rest is easy peasy!

Here's the first test figure:


It's kind of a sketch so needs lots of touch-ups still. I figured the honking big tree trunk was enough of a hint that I didn't have to paint the team in cliche green and yellow. And while I love my cheesecake, I didn't want a naked team running around, so all that pulchritudinous flesh became white spandex. Still more than sexy enough. The uniform is inspired by Bosnia's national football team uniforms, so I have a reminder of the local flavor when I'm back to Canada.

The rest of the team is fully assembled and primed, and will be ready to take the field in the new year. I can't wait to try them out!

Warcrow - the Adventure Begins Again

So it's time for my annual foray into Warcrow Adventures, Corvus Belli's tabletop Dungeon Crawler. This time though I plan on trying...